Monday, November 25, 2013

Welding Request- 11/25

November 25, 2013

Deliverable: Submit welding request

Today our mission was twofold- improve our adjustment mechanism and submit our welding request. We want to have a welded model by next Monday.

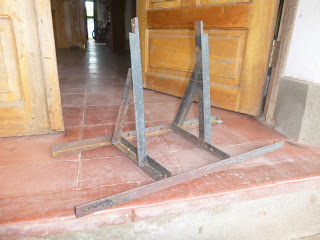
As a reminder, this is our "working" prototype from last class:

Absolutely stunning.

We started the class by brainstorming ideas to change our adjustment mechanism:

This design was having leg posts in different places. One option would be having a pair on either side of the bottom bars; another option would be having one pair of leg posts in the middle

This design would have only two leg posts, instead of two pairs of two leg posts. These legs would swivel on the screws.


Alex's design also incorporates a rotating leg post. She also drew pictures of a man with one central leg, and also a baby.

We talked to Machine Shop Larry and got his opinion. He suggested that we put the leg posts on the outside of the trapezoid, instead of the inside.

We decided on our final design, which is to have one leg per side that swings around on a bolt, and also has a slit in the middle of each leg to be run through a screw that is secured on the other side. We decided to eliminate the top bar of the trapezoid, and put the chainstay supports directly on the two side bars, which turns our design from a trapezoid into a triangle. I know that doesn't quite make sense, but you'll see the pictures soon enough.

Pictured: our new triangle (not trapezoid) frame.

We chose not to cut new pieces of metal for our welded design. Instead, we disassembled the parts from our working model. For our second welded model (if we have time) we'll cut new parts of metal.

In order to get a clean welding line, we filed down the edges of our side bars in order to get an angle that can be attached to the bottom and top bars:

Debbie used a protractor to determine the angles that we needed to shave off.

We shaved off some bits of both sides of the side bars.

We drilled holes through the sides of the side bars for the adjustment mechanism, and away we went. We submitted a request to Machine Shop Larry to weld our design.

These are the pieces of metal that will be used in our bike stand. It's not much, considering the bulk of our last approximately six designs.

A final write-up of our design, including lengths of the pieces.

Since this week is Thanksgiving week, today (Monday) is the only class period we have this week. Next Monday (12/2) we'll be waiting to see if our design got welded, and the Monday after that (12/9) our final model and project write-up is due.

Happy Thanksgiving!

Thursday, November 21, 2013

It lives! Part 1- 11/21

November 21, 2013

Deliverable: Working Prototype

Thank you, good St. Eligius, patron saint of metal workers! Today we tested our prototype, failed miserable, fixed some things, tested again, and our design worked!

We first started the day by attaching the chainstay support to the top of our stand. The epoxy with which it was fastened didn't work, and so we resorted to duct tape and twine.


We put the bike up on the stand, and while it did not collapse, the bike did not fit in the stand. The ends of the top bar hit the gears, so the bike didn't sit flat:


We decided to quickly shorten the top bar, basically making it only as long as it absolutely needed to be.

We started to unscrew the top bar from each sides, which worked well except for one screw. Using our mighty strength we had accidentally secured it too firmly, and we couldn't unscrew it. We tried unfastening the screw and nut using a: screwdriver, wrench, hammer, metal cutter, pliers, and hand saw. This process took about 45 minutes. Finally, Amy tried to use the mini band saw we have in our lab, which didn't work. We then went to the machine shop, where Amy used the bigger band saw. She sawed through the screw, which was good, but she also incidentally welded our drilled hole shut, so we  had to drill another hole. Basically the whole ordeal ate up an hour of our time for something that should have taken approximately 10 minutes. Lesson learned: never trust your time estimates.

With our shortened top bars finally in hand we drilled new holes and reassembled the stand, complete with reattaching the two chainstay supports that had broken off during the kerfuffle. Here is our new, improved bike stand:


We tested the bikes in our classroom, and look at this magic:


Our bike stand works! It successfully holds a bike. Alex tried getting on the bike. She managed to cycle for about two seconds, enough to blend a blueberry, before the structure started to tip over and collapse. We're going to chalk that up to our necessitated screw joints, and when we weld the structure it will be more supported and less likely to buck off the rider.

We talked over our design and looked at things we could improve. On Monday we're going to talk to Larry about the following ideas:

-Completely eliminating the top bar, and having the two side bars reach up and be welded to the chainstay supports.
-Changing our adjustment mechanism from a slitted bar and a screw to a sort of graduated stair case adjustment that would click in place, or another idea.

Monday, November 18, 2013

Working Prototype II- 11/18

November 18, 2013

Deliverable: Working Prototype

Today we began by sharing with the class our progress since the last design review. One of our biggest pain points was how the angle iron had failed to stay attached to the tubing from last week. Epoxy has failed us! In response, Amy suggested that we bolt the angle iron onto the top surface of the base tubing. 


Katie and Alex drilling away...


... and TA DA! The base is complete.
For our working prototype, we decided to bolt the angle iron shut so that we can test the bike in our classroom and see if our prototype does what it is supposed to do -- withstand the weight of the bike, support the chainstays at the right location, and stay upright.

With the base complete, we epoxied the chainstay supports onto the top tubing.


Before we placed the bike onto our stand, we noticed that the chainstay supports were too far apart. We went back and re-adjusted the angle iron to the narrowest possible fixture (i.e., bolted the angle iron together at the innermost holes), but even after this change, the supports were too far apart. We could not make the bike stand any narrower without sanding off some of the angle iron -- it was the only way to make the angle iron slide along the base without it getting stuck at the intersection between the tubing. Alas, we went to Larry, who kindly agreed to help us. He used a machine similar to the drill press, which shaved away the unwanted chunk of angle iron; the machine could be adjusted along multiple directions.
Larry showing us how to sand off extra bits of the angle iron.
Thanks to Larry, we now have a working prototype that can be adjusted for width. Our goal for next class is (1) to use mini clamps to clamp the angle iron into place, (2) and to finally test our prototype. Before Thanksgiving, we hope to file a welding request.


Thursday, November 14, 2013

Working Prototype- 11/14

November 14, 2013

Deliverable: Working Prototype

Today we started class by showing our prototype to Amy and getting ready to test it out on real live bikes! Then we found out that our bottom posts broke off and spent the majority of class trying to epoxy them back on. Twice. We were actually holding two pieces of metal together, praying for the epoxy to bond, right up until the end of class:
Pictured: human clamps.

Scroll down for more pictures, but first: We learned two main lessons today:

Epoxy:
Last time we worked in the lab we tried to use epoxy to connect the parts that we couldn't bolt. The epoxy comes in little packets with two separated gels, and you mix the gels together to get a really firm bond. I tried using epoxy to glue two little pieces of angle iron to make the chainstay (the brackets have a name, we've learned) supports, but after three hours the epoxy still wasn't dried. We then tried using Superglue and hot glue, and nothing worked. We also used Superglue to glue the bottom posts to the bottom legs, and it proved less Super than one would expect. Amy explained that the way I was using epoxy (putting a thin line of one material on one piece of metal, and a thin line of the other material on the other piece of metal) wasn't mixing the two enough, so know we know how to use epoxy. Lesson learned: know how to use your tools, or else you'll be fruitlessly waiting over 48 hours for two tiny pieces of metal to bond together in order to be ready to test out your prototype on Thursday without doing last-minute repairs.

Difference between bolted prototype and welded prototype:

Amy said that it's okay that our bolted prototype and the welded prototype we'll have soon are differently constructed. We have to arrange our strips of metal differently in order to get two sides of the metal that can be bolted, but when we submit our design for welding Machine Shop Larry will be able to weld two sides together that we couldn't bolt together. Lesson learned: sometimes design consistency doesn't matter.

Today:
Today we drilled holes into the angle iron, so we have a fully working prototype that can be used to test whether it can withstand the weight of a bike.

Our first metal prototype, from the side.


We drilled holes in the bottom posts to use as a pseudo-adjustment mechanism until we get the welded version, which uses one big slit per side instead of three small holes.


We use screws and bolts to fasten the legs together (the legs are not attached to the posts in this picture).


Our chainstay supports are glued to the top.


Chainstay support from the side.


Oh look! A Zehra in the background!


From the top, with the adjustment mechanism extended slightly.


This is one of the four joints that will be supporting most of the weight.


Our epoxied chainstay support.

Next class period: test a bike on our metal prototype. Maybe submit the welding request. Who knows, at this point?

Tuesday, November 12, 2013

A Working Prototype

Over the past few days, we have made some serious progress. We finished our final cardboard prototype.


 It came to our concern along the way that balance might be an issue with our new design, however, after extensive research on center of gravity and base of support we came to the conclusion that it would be stable enough to comfortably support a person on top of it. We built another cardboard model, this time using a trapezoid shape instead of a rectangle, which we think will be able to hold the weight more evenly.
Note: In this cardboard model we didn't make legs, because we were running out of time and we knew exactly how the legs would work:


We also had a conversation with Amy, although she was not present that day. She expressed to us that the best way to figure out if the model is stable in this scenario is to build and test a metal version sans welding, so we did:

Screwing the form together.

We cut the steel bars, drilled holes into them, and used screws and bolts to fasten them together. We also tried to use glue to keep certain parts on as a temporary substitute for welding. For next class, we hope to make the structure more permanent by welding certain areas of the stand. After we do this, we will be able to finally test the stand out for function and stability.

Nicaraguan Bike Stand Photos

Today we got an email from our community partner with pictures of the bike stand they're using:


The design is bulky, can't be folded, is hard to adjust, and can't be removed easily. On the other hand, the design is simple and doesn't have a lot of machinations.

Hopefully we can help design a better bike stand.