Tuesday, November 12, 2013

A Working Prototype

Over the past few days, we have made some serious progress. We finished our final cardboard prototype.


 It came to our concern along the way that balance might be an issue with our new design, however, after extensive research on center of gravity and base of support we came to the conclusion that it would be stable enough to comfortably support a person on top of it. We built another cardboard model, this time using a trapezoid shape instead of a rectangle, which we think will be able to hold the weight more evenly.
Note: In this cardboard model we didn't make legs, because we were running out of time and we knew exactly how the legs would work:


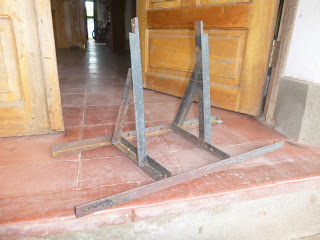
We also had a conversation with Amy, although she was not present that day. She expressed to us that the best way to figure out if the model is stable in this scenario is to build and test a metal version sans welding, so we did:

Screwing the form together.

We cut the steel bars, drilled holes into them, and used screws and bolts to fasten them together. We also tried to use glue to keep certain parts on as a temporary substitute for welding. For next class, we hope to make the structure more permanent by welding certain areas of the stand. After we do this, we will be able to finally test the stand out for function and stability.

Nicaraguan Bike Stand Photos

Today we got an email from our community partner with pictures of the bike stand they're using:


The design is bulky, can't be folded, is hard to adjust, and can't be removed easily. On the other hand, the design is simple and doesn't have a lot of machinations.

Hopefully we can help design a better bike stand.

Sunday, November 10, 2013

Looks-Like Model- 11/9

November 9, 2013

Deliverable: Looks-like model

Today we completed a looks-like (not functions-like) model. We needed to create a model that used cardboard shaped like the metal we're using. The model for today didn't need to hold the bike's weight- it just needed to look like it could, potentially. The dimensions are to scale as best we could construct. 

Our bike stand condenses to 4.5" wide, extends to a little less than 9", and is 16" high. This adjustability accommodates our measurements, which dictated we need a range of 5-9" wide and 15" high. Considering we measured bracket width from the outside of one bracket to the outside of the other, our model works well for the variance in bikes.

This model is made from cardboard, tape, hot glue, foam, and a screw/nut for the adjustment mechanism.


This is our adjustment mechanism. We have a slit running down the middle of the outside feet and the screws that are pushed through the middle feet goes through the slits. The nut goes on the outside of the feet. It tightens to hold the feet together, or loosens to allow it to move.

We had to make pieces that mimicked the shape of tubing and angle iron, to show the welder exactly where and what to weld.

Our bike stand when it's completely scooted in.


We noticed that the bracket supports can't be constructed from angle iron. We had to plan for tubing, which doesn't look at good and I don't think it will be as supportive. On Monday we'll ask if Amy can buy us flat metal.  It's more expensive than the other metals we're using, but considering we only need half a square foot the price should be reasonable.

Tomorrow (11/11) we'll present our idea to Amy and maybe the class and see if they give us feedback. If everything looks good, we'll submit our plan to the welder and get a working model soon. I know I've been saying that for a while but this time I mean it!

Thursday, November 7, 2013

Prototype Review and Refinement- 11/7

November 7, 2013

Deliverable: Looks-like model

Challenge: Draw a bike right now. Try to draw it like you're looking at it from the side.


Today we started off our class period by presenting our prototype we made last class:


Our classmates pointed out potential stability problems, predicting that both sides would tip in towards the bike. They also thought that the bulkiness would be difficult for transportation, and we would need a way to hook the two pieces together for transport.

One thing we learned about our project today is that what we know doesn't always translate to what our audience knows. We thought it was clear that the the bike stand would support the bike brackets, this part right here on either sides:


We actually had to show everyone the actual bike in our lab to explain how the stand would work, which helped us realize the need for detailed communication. When we implement this new bike stand, we'll need to describe exactly how to use it, probably with pictures. Alex showed us Autodesk 123D- an app that lets you build 3D pictures, which we might explore when we start displaying our stand.

Challenge follow-up: Does your bike sketch look anything like the bike sketch above? Probably not. Our project has taught us how difficult bikes are to visualize and draw.

We talked with Machine Shop Larry and he said the same things as our classmates, as well as telling us our options for construction material. We decided to stick with steel over aluminium or tin to keep production cost down, especially since Amy already bought the material. He said that our plan to use angle iron and tubing was a good plan to follow. He suggested that we make a cardboard model of our design that was true to form- use cardboard to create psuedo-angle iron and tubing pieces and figure out exactly how we wanted the pieces welded.

We did a quick brainstorm again, and we came up with the following ideas hopefully to decrease bulkiness and increase foldiness:


Alex explored using a pyramid stand that could stack together like bed risers (top).
She also figured out all the ways that our current design could fold (bottom).


This design is very simple- the bottom two legs go under the wheel, and interlock with a pin for stability.


This design is similar, but has pieces of metal extending out away from the bike to enhance stability.


Keeping with the pyramid design, we expanded the previous two designs to have a triangle support bar on the outside of the bike stand.

As you can see, we're getting much better at drawing bikes and their components, although if a bike ever had to roll on the wheels I draw, it would probably crash and burn.

The three of us spent the remaining hour of class working on three different projects- Debbie worked on building the model of our current design with cardboard that accurately reflected angle iron and tubing metal. Alex explored ways we could stack the pieces. I worked on the "Two Big L's" design.

Here are pictures of the Two Big L cardboard model (not quite to scale):


You can't really see it, but the bottom posts slide out to be adjusted to different widths. We're still figuring out the adjustment mechanism, but we're thinking of either a) drilling holes at intervals and putting a pin to secure, or b) making a slit in one of the posts and then putting a screw through the slit and through the other post. You would loosen the screw to adjust the stand, and tighten the screw when you want it to stay still. This format would also let the stand be adjusted at any length, not just at intervals.

We need to have a working model out of cardboard by next Monday (11/11) so we're meeting this weekend. Hopefully we'll have pictures of our working model by Monday, a metal prototype by next Thursday!

Community partner:

We thought that our community partners in Nicaragua were using the bike stand that the EXTD120 class used last semester. That's not true at all. They're using a bike stand that permanently attaches to the bike, which relegates the bike solely to blending smoothies, not allowing riding. Amy told us that essentially any collapsible, removable bike stand will be an improvement. We asked Lyndsey, our contact person in Nica, to send us a picture of the bike stand, because even Amy doesn't know what they're using currently.

We were really happy to hear this news. We were confused when Lyndsey told us the bike stand was hard to carry and was really bulky, because we thought what we were looking at was relatively well-designed in both categories. Now that we know that she was talking about something completely different that probably is pretty bulky and hard to carry, and difficult for a single person to mount the bike on, we don't have to stress ourselves about drastically reducing the weight from the slim design we have in our classroom.

Monday, November 4, 2013

We're Getting Somewhere- 11/4

November 4, 2013

Deliverable: Experimentation and Sketch Models

We started this class session brainstorming again, this time looking at the bike. We discussed many ideas about how to avoid having to lift the bike too high. We considered crank/pulleys (like a drawbridge that lifted two sides of the stand up to raise the bike), or two arms that raised up to grab the brackets and lift the back wheel up.

We needed to incorporate into our new design what our community partner suggested:

-Improved foldability/ease of transport
-The stand needs to allow one person to get the bike on with ease

Our biggest departure from the previous design was moving from one connected stand, with an adjustment mechanism, to two separate parts that attached to each of the brackets. Debbie brought up this design again:

We liked the simplicity of this design, as well as the fact that we wouldn't have to worry about the width of the bike, but we needed to attach the stands to the bracket, not the hub of the bike.

We made a single upside-down T first, with a U-shaped bracket holder. We showed the idea to Amy, and after we clarified that we would make one for each side, she said (in a roundabout way) that perhaps we were on the right track to completely eliminate the mechanism for adjustment. She also suggested that we use the power of the triangle to ensure stability.

This is our design:


We went to speak with Machine Shop Larry about the welding process we'll need to use, but he wasn't in, so we'll have to wait until Thursday to double-check that this design will be feasible to produce.

Amy said that tubing and angle iron metal are cheaper than flat sheets of metal. We adjusted our design to use just the outline of the design:


Next we made a model with the correct dimensions (exact dimensions are in orange in the picture below): 


Height = 16"
Base = 8" square
Bracket support: 1.5" square, all three sides

Amy ordered our material today, and we gave her our estimate of how much material (a mixture of angle iron and tubing) to buy:

220" of tubing for the frame
10" of angle iron for the bracket support

Advantages of this design:
-No screws; minimal design
-Can accommodate for bikes of any width
-Easy to use- one person can put the bike on the stands (we'll have to test this)
-Stable
-Can be made with tubing & angle iron, materials that are easily found in Nica
-Can be made with other materials, such as PVC pipe, wood, or even very stiff cardboard

Disadvantages
-On the larger side
-Two pieces may be harder to transport or keep track of
-Height cannot be adjusted- every back wheel will be lifted up to 16" off the ground. This may make a particularly smaller bike inclined at a rather steep angle, up to 6" (we'll have to test this to make sure)

We're going to consider making the stand shorter, considering the average height of ground-to-bracket distance was 12.75".

During the next class we're presenting, and hopefully we'll get feedback and suggestions for improvements. After that, we'll be making a working prototype!

Thursday, October 31, 2013

Measurements and Prototype Fine-Tuning- 10/31

October 31, 2013

Deliverable: Experimentation and Sketch Models

Today we measured bikes around campus. We measured the distance from the ground to the bottom of the hub, the distance from the ground to the bracket, and the width between brackets.

The average distance from the bottom of the hub to the ground was 12.72 inches (shortest = 11.5, tallest = 14.5)


The average distance from the bottom of the bracket to the ground was 12.75 (shortest = 11.5, tallest = 15)


The average width between brackets was 5.9 inches. (narrowest = 5, widest = 9)


Last class we had the idea to use overlapping metal plates instead of the shower rod design (one cylinder within another). The metal plates would simplify the production process, since you wouldn't have to worry about getting the cylinders exactly the right sizes to fit one inside the other. With the metal plates, like the cylinders, you would line the holes up and stick a pin through the corresponding holes at the correct width you wanted.


From the measurements we took today we think our ideal width would be 10 inches, and we would want to condense it down to 5 inches. We want the bike stand to be at least 16 inches tall, since our highest bike bracket was 15 inches.

Conversation with community partner:

Lyndsey, our community partner in Nicaragua, said that the good parts of the bike stand are it is strong and easy to use. The bad things are is the bike stand is heavy and bulky to transport. Furthermore, some of the younger members of the group can't lift the bike up and mount it on the stand by themselves. She suggests that we consider another material, and make the stand easier to fold.


New brainstorm: 

We're thinking about a design where instead of lifting the bike up, you roll it up on a ramp. We also need to prioritize the ability to fold, since Lyndsey mentioned that necessity several times.


Next class:
-Research what bike sizes are prevalent in the US and abroad (particularly in Nica, if we can find the data)
-Build a prototype of our sliding-plate
-Consider ways to reduce the weight and bulkiness, perhaps by decreasing the material used

Monday, October 28, 2013

Design Review and Prototype-10/28

October 28, 2013

Deliverable: Design review

Right now we're working on several different things- planning our communication with our community partner in Nicaragua, analyzing our current designs, and brainstorming new ideas from our analyzing.

The new idea du jour is the Upside-down T with Screws Galore:


When we talked to Amy, though, she listed several concerns:
-Screws are best for precise adjustments. Using the screws to adjust for difference in inches will be slow.
-Having the screws near the ground will result in dirt and rocks in the threads.

Thus, we went back to the shower rod idea. We decided we wanted two forms of adjustions: a macro-adjustment mechanism on the bottom, and a micro-adjustment mechanism on the top.

The Bookend Design
We built a cardboard/paper/screw model with a shower rod bottom and a screw top. We have two sides that are reminiscent of bookends


Goals for next class:
-Think about how we can use Nicaragua-local materials.
-Brainstorm ideas for efficient use of shower rod adjustment mechanism.
-Determine the necessary height of the structure (i.e., what distance we need between the bottom adjustment bar and the L-shaped supports.)
-Examine how the wing nuts work in the current design, and apply it to the new design/adjust to optimize top adjustment mechanism.

Community partner questions:
We planned to Skype with our Nicaraguan partners this afternoon, but technical difficulties postponed this opportunity, so Amy is going to email them with our questions. Our questions are as follows:

-- What are the steps you use to use the bike stand?
-- What do you like about the bike stand?
-- What do you dislike about the bike stand?
-- What ideas do you have about improving the bike stand?
-- How important is being able to fold the bike stand? How often do you fold it for transportation/storage?
-- Is there anything else you would like us to know?